WordPress Blacklist Removal: A Complete Recovery Guide
Did you know a blacklisted site gets flagged as dangerous before a single visitor even loads the page? Well, that’s the worst-case scenario. Once you get removed, the steps ahead are well-mapped and worth every bit of effort.
A blacklisted site scares off visitors before they even land on your page. And if you’re reading this, maybe your site is already showing some warning signs. That’s getting scary, right?
Don’t worry, we’ll work through every step to get your site’s reputation back. After following this guide, you’ll know exactly what to fix and where to submit. Without further ado, let’s get into it.
WordPress Blacklist Removal: What It Actually Means
WordPress blacklist removal is the process of getting your site delisted from security databases that flag it as unsafe. It isn’t a one-click fix; you have to clean up the problem first, then formally request a review.
A blacklist is essentially a database maintained by security authorities like Google, McAfee, and Norton. Each one runs independently, so getting flagged by Google doesn’t mean Norton has cleared you. All three have separate removal processes you’ll need to go through.
Most site owners assume removal happens automatically. Well, it doesn’t. Once your domain gets added to a blacklist, it stays there until you request a review and get approved. IP addresses and domains are removed once the underlying malware is resolved.
Why Google and Others Flag Your WordPress Site
Google’s Safe Browsing program flags over 10,000 malicious sites every day, and WordPress sites aren’t immune to that frequency. Most owners don’t even know their site is hacked until Google slaps a warning on it.
If you look at the most common flagging reasons below, you’ll understand just how easy it is for a site to end up on the wrong list.
| Reason for Flagging | What It Means |
| Malware infection | Malicious software planted in your site’s files or database |
| Phishing pages | Fake login pages designed to steal user data |
| Spam links | Hidden links sending spam traffic to shady domains |
| Malicious redirects | Code that pushes visitors to dangerous sites |
| Sending spam | Your server being used to send unsolicited emails |
| IP addresses flagged | Your hosting provider’s IP blocked due to abuse |
For your WordPress site, any of these issues can get your domain added to a blacklist. Even a single piece of malicious code buried in a plugin file is enough to get you flagged.
And once you’re on the list, every major browser warns your visitors to stay away, which cuts your traffic off almost immediately.
Malware Removal First, Then Blacklist Removal
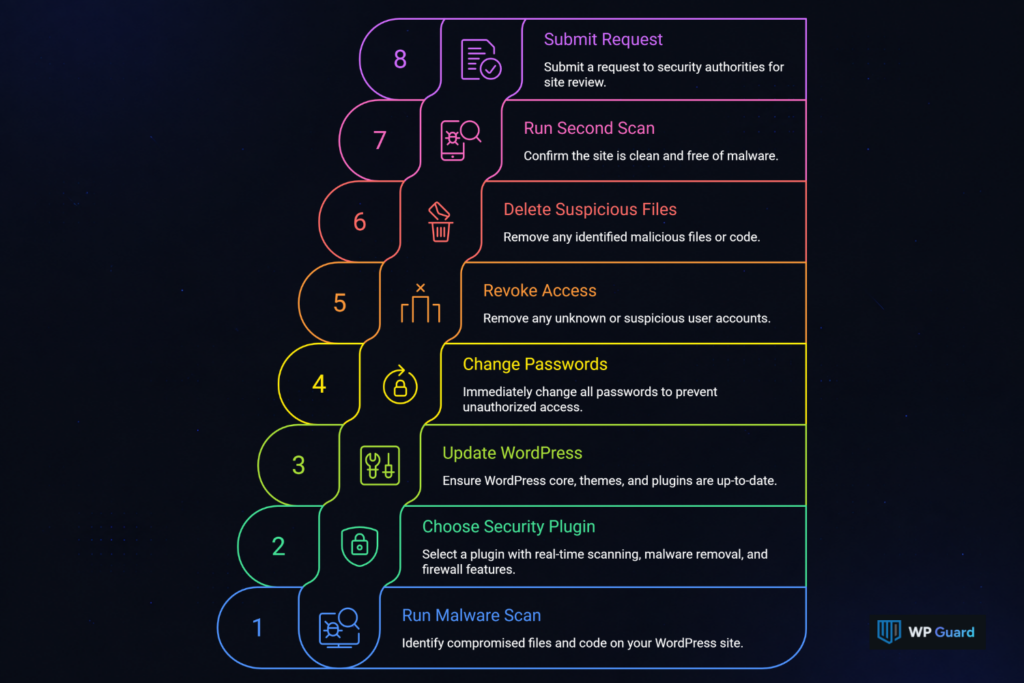
The best part about doing this in the right order is that your removal request won’t get rejected. A lot of site owners rush straight to submitting a blacklist removal request, and security authorities turn it down every time. The reason is simple: they re-scan your site before approving anything.
Think of it this way: if the malware removal isn’t done properly, the re-scan will catch it. And that means you’re back to square one, waiting on another review cycle.
The process has three parts. You need to run a malware scan, pick the right WordPress plugins for the job, and follow the correct steps after cleanup. Each one feeds into the next, and skipping any of them puts your request at risk.
Part 1: Running a Malware Scan on Your WordPress Site
A malware scan is the first step because it shows you exactly what’s compromised before you touch anything else.
Start by logging into your WordPress admin panel and installing a security plugin if you haven’t already. A full scan checks every core file, theme, plugin, and database entry for malicious code. Free scans cover the basics, but deep infections hiding in your server files often slip past them.
That’s why scanning your WordPress site for free is a solid starting point, and upgrading gives you the full picture.
Part 2: Picking the Right WordPress Plugins for Scanning
Not all security plugins are built the same, and the wrong one can leave threats behind. Server-level scanning is where malware removal gets tricky, and many free plugins don’t go that deep.
A few plugins worth knowing about:
- Wordfence: Real-time firewall protection and malware scanning built into one plugin
- Sucuri: Strong on security features like post-hack cleanup and domain blocklist monitoring
- MalCare: Deep server-level scanning with a one-click malware removal option
Your choice here depends on how thorough you need the scan to be. A plugin without server-level access won’t catch everything, and that gap can cost you your removal request.
What to Look For in a Security Plugin
A good security plugin covers three things: real-time scanning, malware removal, and a firewall. Those three working together give your site the best shot at catching threats before they do any damage.
Look for one with an automatic removal tool as well. Manually editing compromised files is time-consuming, and one wrong delete can break your site entirely. Having that tool built in keeps the fix clean and controlled.
What to Avoid When Choosing a Plugin
Skipping the wrong plugins can lead to reinfection before your removal request is even reviewed. A free plugin with no updates in the past six months is a risk. Attackers know which tools have vulnerabilities, and outdated plugins are an open door.
Also watch out for anything without a firewall enabled by default. A plugin that needs manual setup to activate basic protection is one most site owners never configure properly. That leaves your server exposed from day one.
Part 3: Follow These Do’s and Don’ts After a Malware Cleanup
A lot of site owners get this part wrong, and it sends them right back. Before you even think about submitting a request, run through this checklist first.
| Do | Don’t |
| Change all passwords immediately | Submit a request before a second scan |
| Revoke unknown user access | Leave old admin accounts active |
| Update every plugin, theme, and WordPress core | Install nulled or unverified plugins |
| Delete any suspicious files or unknown code | Ignore warnings in your security dashboard |
| Run a second scan to confirm the site is clean | Rush the process to save time |
Skipping any of these steps gives attackers a way back in. And if security authorities re-scan your site and find anything left behind, security authorities reject your removal request without a second look.
Blacklist Removal Requests: How the Process Works
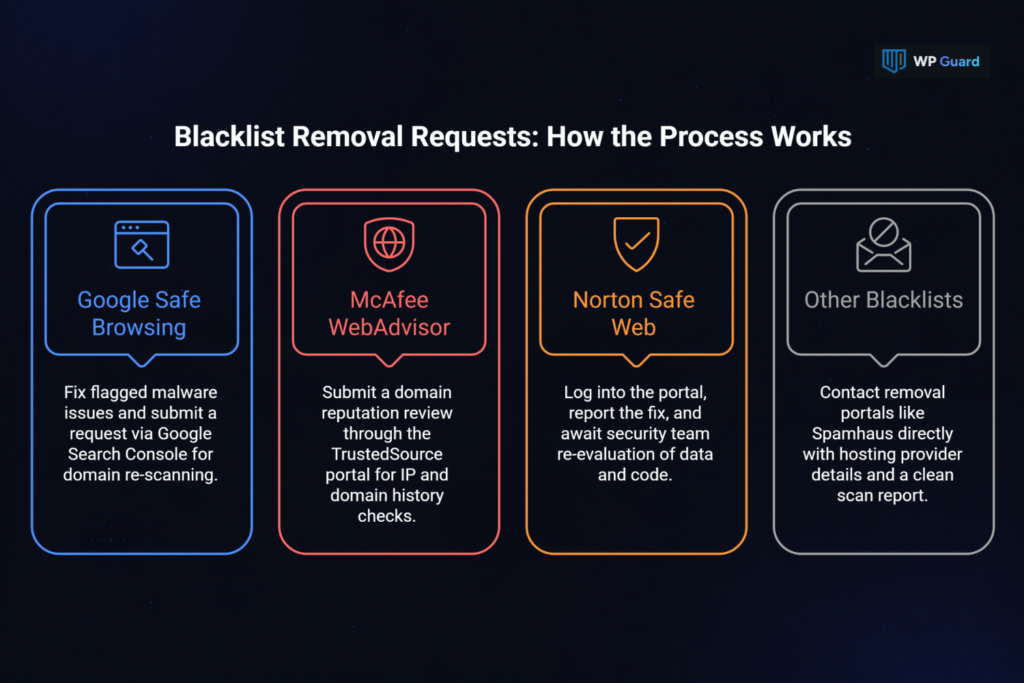
Each major blacklist has its own portal, and you’ll need to submit a separate request for each one. As covered earlier, Google, McAfee, and Norton all run independent processes, so getting removed from one doesn’t fix your standing across the board.
Here’s a quick look at how each platform handles removal requests:
- Google Safe Browsing: After fixing all flagged malware issues, head straight to Google Search Console and submit your request from there. Google re-scans your domain before approving anything.
- McAfee WebAdvisor: Submit a domain reputation review through the TrustedSource portal. From there, McAfee checks your site’s IP and domain history before making a call.
- Norton Safe Web: Log into their portal, report the fix, and wait for their security team to re-evaluate your site. On top of that, Norton focuses heavily on data breaches and malicious code history.
- Other Blacklists: Spam databases like Spamhaus flag IP addresses tied to sending spam or unsolicited emails. Contact their removal portal directly with your hosting provider details and a clean scan report.
At the end of the day, review times vary by platform. Google typically responds within 72 hours, but others can take several days longer depending on the severity of the original issue.
Google Search Console and the Review Request Process
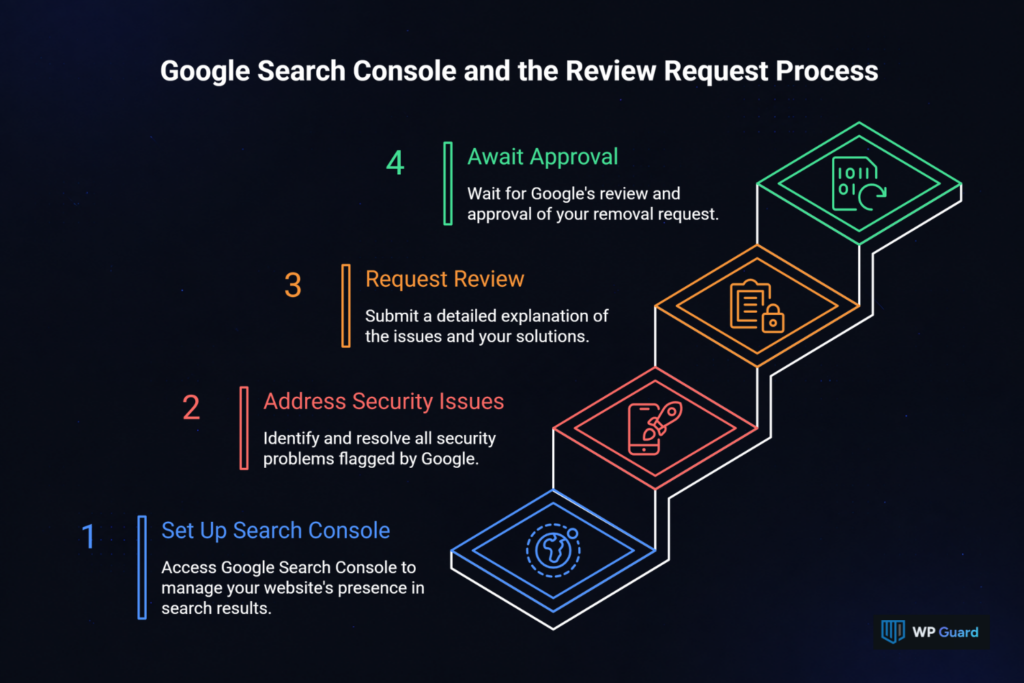
A lot of site owners skip Search Console entirely, and that’s exactly why their removal requests go nowhere. Google Search Console is the only place where you can submit a blacklist removal request directly to Google, and it’s free to set up if you haven’t already.
Once you’re in, head to the Security Issues report. That’s where Google lists every specific problem it flagged on your site, from malicious code to spam pages. Work through each one and confirm they’re fully resolved before you move forward.
From there, hit the Request a Review button and explain what happened. Be straightforward about what caused the issue and what steps you took to fix it. Google’s reviewers go through a lot of these requests, and a clear, honest explanation gives them less reason to delay your approval.
One thing worth knowing: don’t submit the request more than once. Multiple submissions don’t speed up the process. In fact, they can flag your domain as a repeat problem, which pushes your review further back in the queue.
Keeping Your Site Off the List After Removal
Staying off the blacklist is a lot easier than getting off it, and it starts with a few consistent habits. Your WordPress website is a target whether you think it is or not, and one unpatched vulnerability is all it takes to end up back in the same situation.
Follow these four security habits to keep your site off the list for good:
- Website Monitoring: Security and vulnerability monitoring gives you instant alerts the moment suspicious activity shows up on your site, so you can act before it reaches blacklist-triggering severity.
- Regular Malware Scanning: Schedule malware scanning at least once a week. Bad bot traffic and malicious code don’t wait around, and catching threats early keeps your domain reputation clean.
- Firewall Protection: A WordPress firewall blocks attackers, filters bad bot requests, and stops malicious software from reaching your server. When you get one enabled and running, your server has a permanent filter against the most common attack types.
- Security Experts on Call: Having professional assistance available means vulnerabilities get flagged and fixed before hackers find them first. That’s the kind of protection most business owners don’t think about until it’s too late.
The sites that stay off blacklists don’t get there by accident. Consistency with these four habits is what makes the difference in your site’s health.
The Hard Part’s Done. Time to Lock Things Down.
Blacklist removal is a process, not a one-time fix, and the sites that stay clean are the ones with proper security habits running in the background.
If you’d rather not manage all of this yourself, that’s exactly what our team at WP Guard is here for. We watch your WordPress site 24/7, run regular malware scans, and if something goes wrong with a covered site, getting it back is our job, not yours. Your business and your customers deserve that level of protection.
A single unmonitored vulnerability can put you right back on the blacklist within weeks. So don’t leave it to chance. Get professional assistance, stay consistent with your security routine, and your domain will stay safe.